Week 15 | Web IV
Please leave me a comment with a link to your HTML web design page AS WELL AS your homework page showing me your completed CODE ACADEMY.
DUE DATE:
MONDAY, MAY 12TH – NO LATER THAN 1PM.
LATE SUBMISSIONS WILL NOT BE ACCEPTED.
The following information encompasses your final project for the semester.
OVERALL
- Correct doctype
- Properly nested elements
- Clean code
- COMPLETED code academy lessons
PAGES
- Resume
- Artist Statement
- Contact
- Bio
- Homework
- Portfolio
- List
- Photo Page
- Table
- Thumbnail Gallery
- Webpage
- Index
LISTS
- Unordered list
- Ordered list
- Definition list
- List within a list
TABLE
1 table
LINKS
- A href
- Target = blank
- Portfolio page – thumbnail image clicks to larger image
- Bag to the top link
- Embed a video
- Embed a sound file
NAVIGATION
- Consistent navigation on all pages
- H1
- H2
- H3
CSS
- External CSS page
- At least one paragraph with a background color
Week 14 | Web III
WHAT IS CSS?
Introduction to CSS
CSS adds styles to your web pages: it’s the skin over the bones of HTML. This tutorial will teach you how to style our webpages.
- Cascading Style Sheets (CSS) are a standard developed to allow designers control over presentational elements of a Web page and effectively separate content from presentation.
- A style is a group of attributes that are called by a single name.
- A style sheet is a group of styles.
- The cascade part of CSS means that more than one stylesheet can be attached to a document, and all of them can influence the presentation. It also means that different applications of CSS can be applied to a page in order of precedence: inline, embedded, external and default.
CODE ACADEMY LESSON IV
1. What’s CSS? Lessons 1-6
The basics: what CSS is, how it works, and why we separate form from function.
CSS SYNTAX

The CSS syntax is a little different from the tag and attribute format of HTML. A CSS style is made up of a selector, which is the HTML element or class name you wish to define rules for, and a set of properties and values. A property and its value are separated by a colon (:). You can define multiple properties for a style, separating them with a semi-colon(;). Property/value sets are enclosed in brackets{}.
For example, if you wanted to redefine all HTML in your <p> tags to look like this, then your style would look like this:
p {

color: #00CC00;

font-size: 13px;

font-family: "Courier New", Courier, monospace;

font-weight: bold; text-decoration:none;

}
The order of properties doesn’t matter, as long as you separate them with a semi-colon. Property values that have multiple words are surrounded by double quotes: “Courier New”.
You can apply the same style to multiple selectors by grouping them:
h1, h2, h3, h4 {
color: #00CC00
}
There is a full CSS reference and extensive code examples at:
also at: http://www.barelyfitz.com/screencast/html-training/css/positioning/
CODE ACADEMY LESSON IV
2. CSS Syntax
Now that you know what CSS is, it’s time to learn how to use it.
Sizing in CSS
There are a number of different measurement schemas within xHTML / CSS. Which one to use depends on context, and you can mix and match them.
px– number of pixels, relative to the screen size. This is the most consistent across machines, browsers, monitors%– percentage of the total width or heightem– size relative to the em size of the base font
We will go into when it is appropriate to use the various schemes in later weeks. For now, use the px units in your stylesheets.
CODE ACADEMY LESSON IV
3. Details, Details
You’ve got basic CSS under your belt—now we’ll cover some of the finer aspects.
The three types of HTML elements to apply styles to:
An important concept to understand is that there are basically three types of HTML tags: block-level elements, inline elements, and replaced tags.
- Think of block-level elements as boxes that have a line break before and after. Block-level elements are the ones you will spend most of your time applying style rules to, or manipulating with scripting. They include
h1-h6, p, div, ul, ol, blockquote. - Inline elements on the other hand, don’t have line breaks before and after. Inline elements are used in the middle of another element, and include
a, b, strong, italic, em, span - The third kind of HTML tag is called a replaced tag. What it means is simply that these elements have a set width and height. The most-used replaced tag is the <img> tag, which you must specify a height and width for.
If an element is not explicitly defined, it is known as an anonymous element.You will not be able to style this element directly.
CLASSES AND IDS
Classes and Ids are a way to designate specific elements in your HTML. You can apply either a class or id or both to any element:
<div id="navigation">
<p>
There is one key difference between a classes and ids:
- IDs can only be applied to one element per page
- Classes can be applied to multiple elements per page
When naming classes and ids, it is good practice to name them logically and semantically. The names should not describe the physical attributes of the style you plan to apply to them, but the type of thing that they are in the structure of your page. For example, if you have a unordered list of links that will serve as your navigation, this:
<ul id = "navigation">
is better than this:
<ul id = "top">
The reason for this once again we want to separate the structure from the presentation. Naming your classes and ids logically means that if you radically change the color scheme or layout defined by your style sheet, the structure will still make sense.
3 WAYS TO USE STYLE SHEETS
***NOTE: IN ORDER FOR YOU HTML PAGES TO ACCEPT THE STYLE.CSS FILE, YOU MUST INCLUDE THE FOLLOWING CODE IN THE HEAD OF YOUR HTML PAGE:
<link rel=”stylesheet” type=”text/
There are three methods of accessing style sheets from your HTML:
- Inline as part of an HTML tag.
- Embedded in the <head> section of your page between <style></style> tags
- In an external document that is linked to the page
Here is an example of a page that uses inline and embedded styles:
We are going to focus primarily on using external style sheets. The are a couple of advantages to this. First, you can apply the same styles to some or all pages of your site. Second, you can make a change on the external style sheet and all the pages it is linked to will change. And last, with a simple change to your code, you can switch style sheets and completely alter the look of your page.
Style sheets work in 4.x or later browsers (but still not consistently) such as Navigator 4.5 or 6 and IE 4 or 5. Most earlier browsers ignore them.
A good place to see style sheets in action, and to really understand how powerful they are, is the CSS Zen Garden.
CREATING AND LINKING TO YOUR OWN EXTERNAL STYLE SHEET
An external style sheet is a plain text document containing all the style declarations you wish to apply to the linked pages. It does not have the structural tags (html, head, body) that your HTML documents have.
Once you have created your style sheet, you can associate it with your page using the link tag in your HTML, placed between the <head> tags:
<link href="styke.css" rel="stylesheet" type="text/css"/>
MANIPULATING BASIC CSS PROPERTIES
CSS Classes and IDs
This tutorial covers how to group CSS selectors into classes or identify a single selector by ID.
CSS Selectors: 23 exercises
WEB DEVELOPER ADD-ONS
There is an excellent suite of Firefox and Google Chrome add-ons that will help you in your site development. We’re going to install them now, and I highly recommend that you install them on your home machine:
If you’re using Google Chrome, download this Web Developer Add-On.
As the course goes on, we are going to learn to use the various tools included in the suite.
VALIDATING YOUR CODE
It is essential to make sure that you are writing valid xHTML code. Improperly formatted code can cause your pages to render in unpredictable ways or not at all in various browsers.
The W3C offers a free validator that you can run any html page through:
You can also access the validator through the “Tools” menu in the Web developer toolbar.
HOMEWORK
CODE ACADEMY | Introduction to CSS
No. 7 | CSS AN OVERVIEW
NO. 8 | DESIGN A BUTTON ON YOUR WEBSITE
CODE ACADEMY | CSS Classes and IDs
NO. 9 | CSS SELECTORS
NO. 10 | SORTING YOUR FRIENDS
CSS
USING THE WHAT IS CSS? VIDEO WE WATCHED INN\ CLASS —
Go to one of the html pages you already created and add three div’s that corollate to three div styles in the style.css page you created.
- Complete ALL the code academy tutorials finishing with Introduction to CSS No. 7 CSS: An Overview.
- Using all the properties we have covered today, create a single, external stylesheet and apply it to both your bio and your resume pages.
- Post the new work and link it to your homework page.
- Go back into your index.html, artist.html, resume.html and contact.html pages and add div’s.
- Create a style.css page in Text Wrangler and link it to your index.html, artist.html, resume.html and contact.html pages. Add the div names in your css page and STYLE them including font, color, size and any other attributes you want to use.
- Take any 12 images. They can be photos, illustrations, your artwork, anything you have. If you do not have anything you can pull images from Google images or create different colored boxes and use those as images. Create two different sizes of these images, one thumbnail image and one full size image. The full size image should not exceed 800×600 pixels. Use the “Save for Web” process to optimize the images, saving them in the file format most appropriate for each image. Save these images to the “images” folder you created in week two.
- Create HTML / CSS using the thumbnail size of the images that duplicates the functionality of the thumbnail gallery that we went over in class today. Take the thumbnail gallery one step further – link each thumbnail to its full sized image. Post the files and images to your server and put the link to the gallery on your blog.
- Add a background image.
- Make one of your images link to another website.
- Add ALT, HEIGHT & WIDTH properties to all your images.
- Add a border to one of your pages.
Week 13 | Web II
Lists Within Lists
- OPEN and Unordered List
- CREATE a line in the list BUT do not close the li
- OPEN the Ordered List
- CREATE several lines in the list
- CLOSE the Ordered List
- CLOSE the line and keep going
SEE THE CODE BELOW
<ul>
<li>Interests
<ol>
<li>Golf</li>
<li>Sleep</li>
<li>Lasers</li>
</ol>
</li>
<li>Favorite Teams</li>
</ul>
<ul>
<li>Interests
<ul>
<li>Golf</li>
<li>Sleep</li>
<li>Lasers</li>
</ul>
</li>
<li>Favor
DO NOW | CODE ACADEMY
HTML Structure: Using Lists
Social Networking Profile – Exercises 1-7
TABLES
- Tables are a way to store tabular data so it is easy to read.
- It’s a way to present information neatly in a table with rows and columns.
- To create a table, you have to start with the tag below:
<table>
- To add rows of information, use the tag below.
<tr> This tag tells each row how many cells to have.
Add a single <td>(“table data”) cell to the first row, which creates a single column. See below:
 <table >
<tr>
<td>One</td>
</tr>
<tr>
<td>One</td>
</tr>
<tr>
<td>One</td>
</tr>
TO ADD TWO COLUMNS TO A TABLE SEE THE CODE BELOW:
<table>
<tr>
<td>King Kong</td>
<td>1897</td>
</tr>
<tr>
<td>Dracula</td>
<td>1897</td>
</tr>
<tr>
<td>Bride of Frankenstein</td>
<td>1935</td>
</tr>
</table>
DO NOW | CODE ACADEMY
HTML Basics III
Tables
Lessons 6-10
DIV AND SPAN TAGS
DIV and SPAN tags are “structure tags”.
<div></div>
Short for “division,” <div> the div tag allows you to divide your page into containers (that is, different pieces).
<span> </span>
The span tag lets you to control styling for smaller parts of your page, such as text. If for instance you always want the first word of your paragraphs to be red, you can wrap each first word in<span></span> tags and make them any color you want.
DO NOW | CODE ACADEMY
HTML Basics III
Lessons 11-15
HTML: INSERTING IMAGES
IMAGE FILE FORMATS: Review
There are three primary image file formats used for graphics viewed on the web. Each of these file types were designed for the purpose of compressing memory usage. Each file type does this a different way. NOTE: .PSD, .AI and .INDD files will NOT show up on your website.
REVIEW FROM PHOTOSHOP
Jpeg
Jpegs work well on photographs, naturalistic artwork, and similar material; not so well on lettering, simple cartoons, or line drawings. JPEG is “lossy,” meaning that the decompressed image isn’t quite the same as the one you started with. (There are lossless image compression algorithms, but JPEG achieves much greater compression than is possible with lossless methods.) JPEG is designed to exploit known limitations of the human eye, notably the fact that small color changes are perceived less accurately than small changes in brightness.
Gif
Graphics Interchange Format. A format used for displaying bitmap images on World Wide Web pages, usually called a “gif” because .gif is the filename extension. These files use “lossless” compression and can have up to 256 colors.
Png-8 and Png-24
PNG is a compression scheme that has two main benefits: it is a lossless compression image format and it holds alpha channel information. Originally, the Portable Network Graphics (PNG) format was designed as a royalty-free format, which would replace GIF and JPEG. Png-24 allows for smooth blending between alpha and opaque.
Image Size
When speaking about image size on the web, there are three possible interpretations of this that you must take into account.
File Size refers to the amount of disk space an image occupies (in KB or MB)
Image Dimensions refers to the physical size of the image, expressed in height and width.
Resolution refers the pixel density of an image. This is expressed in pixels per inch (ppi). Images are displayed on the web at 72 dpi. Printed images are generally of higher resolution.
Resize your images in Photoshop PRIOR to uploading them on the web.
Compression
Compression shrinks down the file size of the photo so that it loads on the user’s computer quickly, but maintains a certain level of quality.
SAVING IMAGES
Saving Images Out of Photoshop or Illustrator
Both Photoshop and Illustrator have excellent options for optimizing images for the Web, via the “Save for Web” menu. It is better to use this option rather than “Save As” or “Export” options, as you will have more control over the output settings and the final file size will be smaller because no preview image is saved with the file.
Save and Export
There are two ways of saving a photo in Photoshop. The first is to use the Save As… dialogue, the other is called Save for Web & Devices… which is used to save your photos in preparation for publication to the Web.
1) Save as: FIRST, save the file type as a Photoshop or .PSD file. This will save extra Photoshop-specific information about your photo and allows you to go back to the file at a later date and manipulate all layers. You will not lose any quality when you re-save it multiple times. THEN, save as a .jpg, .png or .gif which compresses the photo allowing you to use it on the web.
2) Save for Web: Use this when you are ready to export your photo for publication to the Web. The Save for Web allows you to see how your photo will appear once it’s published to a Web site. Optimized will show you how your photo will appear once it’s published on a Web site, and 2-up/4-up will show you comparisons so you can see how the different levels of compression will affect your photo when saving. These are automated ways to save your image for the Web.
***Here’s a great reference for “save for web”.
3 Ways you can Retrieve Images to Place onto your Website
Use a third party image hosting site like Flickr.
Flickr:
Upload your image to your Flickr account and copy the image URL. To get the direct URL of an image on Flickr do the following:
Upload your own image or search and find an image already on Flickr. One you’ve got the image you want to use, right click on the image and then click on “view all sizes”. Choose your size and click on it. You’ll see the image with various image sizes listed above it. Choose your size and click on it. Right click on the image and choose “copy image URL”. NOTE: you need the direct url to image with a files extension of .jpg, .gif or .png.
<img src=”http://farm5.staticflickr.com/4081/4883281674_8428f07e53_z.jpg”>
Use a direct URL to a website.
Find your image anywhere on the web. Click on the image and then click on “full-size image”. Copy the URL and place the full URL into your HTML file.
<img src=”http://discovermagazine.com/2012/jul-aug/06-what-is-your-dog-thinking/dog1.jpg”>
Upload your own image via FTP to your own web hosting space.
Log into your web hosting space via FTP and upload your images. It’s good practice to place them inside a folder called: images.
<img src=”images/dog.jpg”>
Here’s a great resource for finding images released under Creative Commons.
ADDING IMAGES TO YOUR PAGES
Images are displayed on the web using the image tag:
<img>
This is the basic syntax for using the image tag:
<img src=”images/dog.jpg”>
You MUST upload the image to your ftp site for the web browser to find it. Use JPGs for photographs, and GIFs or PNGs for line art or most screenshots.
Create a subfolder on you FTP site called “images.” Whatever images you want to show on your web pages, upload them to this “images” folder.
The “alt” attribute is used for the text that will display if an image does not load in the browser, and in some browsers is visible when you hover over the image with the mouse:
<img src=”images/dog.jpg” alt=”Spot the Beagle” />
The image tag also allows you to input a numeric value for the height and width of an image. It is a good idea to specify the height and width, as this allows the browser to render the page faster.
<img src=”images/dog.jpg” alt=”Spot the Beagle” height=”400px” width=”200px”>
You can try it out on W3Schools.
Pulling an Image from the Web
If you’re pulling in an image from the web, view its properties to grab the absolute URL. If you are pulling in an image from a folder on your a server, call to it correctly:
Examples:
<img src="http://www.url.com/nameofimage.jpg" alt="Name of Image">This image is located somewhere else on the web.<img src="images/dog.jpg" alt="Spot the Beagle">This image is located within a folder called images on my server.
Images as Links
You can use an image to link to another document by simply wrapping an image tag in a link tag:
<a href="filename.html”><img src=”image/dog.jpg“ alt="Spot the Beagle"></a>
You can see an example on W3Schools here.
DO NOW | CODE ACADEMY
HTML Structure: Tables, Divs, and Spans | IMAGES
No. 6 | Clickable Photo Page – Exercises 1-7
Background Images
You can set an image as a background in any page element. The properties of background images are detailed here:
****Here’s a great link several sites that generate backgrounds for you. You can create gradients, stripes, tartans, tiles and patterns.
Putting it All Together: Images and CSS
<!DOCTYPE html>
<html>
<head>
<title>HTML Images Tutorial</title>
<link rel=”stylesheet” type=”text/css” href=”style.css”>
</head>
<body>
<h1>
HTML Images Tutorial
</h1>
<h3>
There are three way to place <i>images</i> onto your HTML page.
</h3>
<ol>
<li>Use a third party web hosting space.</li>
<li>Link to an image already on the web.</li>
<li>Upload an image to your web hosting space using FTP.</li>
</ol>
<p>
Use a direct link to pull this image from <b>Flickr</b>or another image hosting site.
</p>
<div align=”left”>
<img src=”http://farm5.staticflickr.com/4081/4883281674_8428f07e53_z.jpg”>
</div>
<p>
Upload an image to your site by <b>linking</b> to an image anywhere on the web.
</p>
<div align=”left”><img src=”http://discovermagazine.com/2012/jul-aug/06-what-is-your-dog-thinking/dog1.jpg”>
</div>
<p>Or, you can <b>upload</b> an image to your web hosting space using<strong>FTP.</strong>
<div align=”left”>
<img src=”images/dog.jpeg”>
</div>
</p>
<p>
You can even use an image as a link to a <b>URL</b> anywhere on the web.
</p>
<p>Create a link of an image:
<a href=”http://www.blogcdn.com/www.urlesque.com/media/2008/11/23-pooch11.jpg”>
<img src=”images/Blinky_Dog.gif” alt=”dog gif”></a>
</p>
</body>
</html>
If you use the HTML above, you can see what the site looks like in the screenshot below.

You can see the FULL HTML page here. The HTML was upload to web space using FTP.
Image Spacing and Alignment
Let’s see how it looks when you add text. Type in “This is one crazy dog!” directly after the close of the img tag. The text will bump up against the edge of the image and wraps around the bottom of the image (depending on how much text you’ve written). To make the text wrap correctly, add an “align” attribute to the image. It’s your choice whether you want to align it to the right or left by using align=”left/right”.
In the image below I’ve added the attribute align=”left” – see the full code here: <img src=”images/dog.jpeg” align=”left” />

A Simple Thumbnail Gallery
This method creates a flexible grid of thumbnail images and captions that dynamically fills rows based on the browser width. This is what it looks like in action:
Each thumbnail and caption is part of an unordered list (ul) with the id “thumbnails”. The list items (li) are set to display:inline and float:left and have background, margin and padding set to create the white boxes around them.
Rounded Corners
It seems like the trend nowadays are images that have rounded corners. If you don’t want to manually do it in photoshop or illustrator, use this online service called RoundPic.
View the links below to learn more about rounded corners and background images.
Embedding Multimedia
Playing Quicktime and Flash Movies
The QuickTime format is developed by Apple. Videos stored in the QuickTime format have the extension .mov.
QuickTime is a common format on the Internet, but QuickTime movies cannot be played on a Windows computer without an extra (free) component installed.
With the object element, code that will play a QuickTime movie can easily be added to a web page. The object can be set to automatically install a QuickTime player if it is not already installed on the users computer.
If you use a third-party service like Youtube, Vimeo, Google, or blip.tv, you can just copy their embed code and paste it into your .html file.
- Choose video
- Choose share
- Choose embed
- Copy code
<iframe width=”640″ height=”360″ src=”//www.youtube.com/embed/rmTg-qHcGs4″ frameborder=”0″ allowfullscreen></iframe>
EMBEDDING AUDIO
There are several different types of music formats that are used…so which one do we use for the web?
The WAVE format is one of the most popular sound format on the Internet, and it is supported by all popular browsers. If you want recorded sound (music or speech) to be available to all your visitors, you should use the WAVE format.
The MP3 format is the new and upcoming format for recorded music. If your website is about recorded music, the MP3 format is the choice of the future.
ADDING INLINE SOUND
When sound is included in a web page, or as part of a web page, it is called inline sound.
If you plan to use inline sounds in your web applications, be aware that many people find inline sound annoying. Also note that some users might have turned off the inline sound option in their browser.
My best advice is to include inline sound only in web pages where the user expects to hear the sound. An example of this is a page which opens after the user has clicked on a link to hear a recording.
So if you insist… you just need to use the tag.
<embed src="beatles.mid" />
HYPERLINKING SOUND
If a web page includes a hyperlink to a media file, most browsers will use a “helper application” to play the file.
The following code fragment displays a link to a music file. If a user clicks on the link, the browser will launch a helper application and play the music file.
<a href="nameofyoursong.wav">Play this tune</a>
HOMEWORK | WEEK 13
CODE ACADEMY | SOCIAL MEDIA NETWORKING
If you haven’t already done so, complete the social media networking section under the course.
HTML Structure: Using Lists. It’s listed as number 4.
CODE ACADEMY | LIST WITHIN LIST
On one of your pages create a list within a list using ordered and ordered list.
CODE ACADEMY | TABLES
On one of your pages create three tables.
- One table with one column and three items.
- One table with two columns and three items.
- One table with three columns and three items.
CODE ACADEMY | Clickable Photo Page
HTML Structure: Tables, Divs, and Spans
No. 6 | Clickable Photo Page
Create a NEW html page called portfolio.html and create a clickable photo pages using images you created from the Photoshop and/or Illustrator section of the class. Upload it to you site.
Rounded Pictures
Add at least three rounded photos on your portfolio page.
EMBED VIDEO
Add a video to any page on your website.
EMBED AUDIO
Go to Sound Cloud and find any sound, copy the source code and embed it on any page.
Week 12 | Web 1
W3 SCHOOLS
This is a great resource site, I’m going to be referring to it a lot this class and in the future. If you are ever stuck for how to do something, start here:
http://w3schools.com
MANAGE YOUR SITE: REMOTE VS. LOCAL FILE SYSTEMS
When we build a Web site, we develop them on our local (or “desktop”) machine, and publish them to a remote “Web server”. A Web server is a computer that is essentially the same as your desktop machine, but has server software installed that allows it to take http requests from an internet user’s computer (or “client”), and deliver the requested html document to the user’s browser. This client / server relationship is the basis of all Web activity.
What we call a “site” is really just a collection of html documents that we associate via internal references (links) between them. In order to keep your site organized, and to ensure that it functions exactly the same online as on your desktop, you must keep the file and directory structure exactly the same on the local and remote machines.
The first step in doing this is to organize your local file structure. First, create a “root” folder on your local machine or flash drive from which you are going to work. This folder could be named for the course (interactivemedia) or your username (najlahhicks). It doesn’t matter what the name is at the top level.
For the beginning of this class, I’m going to dictate a file structure that I want you all to use.
Within your root directory, create two directories:
working_files
public_html
From now on, the “working_files” directory will hold documents and images that you use as resource files for building your site, but not any files that will uploaded to the site itself. Put the resume text file that you brought today into this directory.
The public_html directory will contain all files that will actually become part of your site. Put the bio html file that you created as homework in that directory now.
Within the html directory, also create a subdirectory called:
images
We will use this directory later in the course to store any images that will appear in your web site.
UPLOADING YOUR FILES USING FTP/SFTP
Your html files are uploaded to the Web server using FTP, or File Transfer Protocol. You will need an FTP client to do this. If you are using the A server, you will need a program that supports SFTP, or Secure File Transfer Protocol. Here are likes to some popular programs:
Fugu (MAC) – This program is free.
Fetch (MAC)
CyberDuck (MAC) – This program is free.
FileZilla (PC) – This program is free.
All these programs function essentially the same. To connect to your remote server, you enter the address of the FTP server, your username and password.
***NOTE: You can upload files through the Bluehost file manager.
Intro to HTML
HTML is the language of Web browsers. HTML stands for HyperText Markup Language. HTML is a simple scripting language originally designed to allow nonlinear navigation of large text documents. It is constantly undergoing revision and evolution to meet the demands and requirements of the growing Internet audience under the direction of the W3Schools, the organization charged with designing and maintaining the language.
HyperText is the method by which you move around on the web. Clicking on specially coded text called hyperlinks navigates you to other pages. The term hyper indicates that the hierarchy of the pages is not linear — i.e. you can go to any place on the Internet whenever you want by clicking on links — there is no set order to do things in. Markup refers to HTML “does”.
HTML Syntax
All HTML syntax is composed of discreet pieces of code called elements. Elements are made up of paired opening and closing tags.
FILE NAMING CONVENTIONS AND INDEX.HTML
There are a few rules that govern the naming of web files and directories:
All Web page files must end with .html or .htm. These extensions are interchangeable, but generally we use .html
Names are case sensitive. This means that Bio.html and bio.html will be considered by the server as two different files.
Spaces and non-alphanumeric characters are not allowed, with the exception of underscore (_) and hyphen (-)
The “home” page of a Web site is always called index.html or index.htm. If this file does not exist, you will either get an error or see a directory listing of the root directory, depending on how the Web server is configured.
My suggestion to all of you is that you come up with a naming convention for yourself now, and stick to it. This will avoid a lot of problems later on! For example, my naming convention is to use all lowercase letters, and to use underscores instead of spaces:
my_name.html
HTML Syntax
All HTML syntax is composed of discreet pieces of code called elements. Elements are made up of paired opening and closing tags.
Tags
Each tag has a specific meaning that communicates to the browse what it should do with the content between the opening and closing tag. For example, the <b></b> tag tells the browser to make bold all text contained between its opening and closing tags.
Tags are the cornerstone of HTML. Tags are instructions to the Web browser that dictate the display of text, images and other elements on the page and are not visible when the page is displayed to the user. You can recognize an HTML tag because it appears in between greater than and less than signs:
<tagname>
There is a large set of pre-designated tags within HTML. Today we are going to cover the basic tags needed for building a basic HTML page and formatting text.
There are two types of tags, container tags and non-container tags.
Container tags appear in pairs, as an opening tag and as a closing tag, like so:
<tagname> </tagname>
Everything contained between the opening <> and closing </> tags is subject to the tag properties.
Non-container tags appear singly, and are what is called “self-closing.” This means that they do not appear in sets, but only as a single tag. In this case, the page content affect by the tag is all contained within the single tag, like so:
<tagname tagcontent />
Note: Previous versions of HTML did not require the closing “/” character at the end of the non-container tag, and it will generally function correctly in most browsers without it, but for the specification we will be using as the standard for this class, you will need to include this.
Attributes
In the language of HTML, attributes serve to modify tags, much like an adjective modifies a noun. As the name implies, attributes are properties of the tag. Each tag has properties that can be changed via the use of the attributes that are associated with it. Attributes follow the tag name within a tags opening component, in between the greater than and less than signs, like so:
<tagname attributename=”value”>
The order of attributes is not important. You can place as many attributes inside a tag as is needed:
<tag attribute1=”value1″ attribute2=”value2″ attribute=”value3″>
Page Structure
In order for a Web browser to recognize a file as an HTML document, it must contain the proper structure. At the minimum, it must contain five basic tags. These tags must appear in the correct order. The page structure tags are as follows:
DOCTYPE tells the Web browser which HTML or XHTML standard your document is written to. For this class, you should use XHTML5 transitional. This is the first thing that should appear in any HTML document that you write.
<!DOCTYPE html>
Always use the code exactly as it appears above.
The <html> tag comes next. It encloses all other tags and content on the page, and further serves to instruct the browser that what is being rendered on the rest of the page. You should use this format for the html tag:
Third is the <head> tag which contains information that is not displayed in the browser window. For instance, a head tag may include information that search engines may use to find the page.
The <title> tag contains the text that appears in the title bar of the browser window. It is nested within the head tag.
The <body> tag contains all of the information to be displayed by the browser.
Using these tags, you can build a basic page structure:
<!DOCTYPE html>
<html>
<head>
<title>My First HTML Page</title>
</head>
<body>
Anything inside the body tags will appear on your Web page.
</body>
</html>
Use this template as the basis for all of your HTML pages!
INTRODUCTION TO HTML
HTML Basics | Fundamentals of HTML
DOCUMENTS MUST HAVE LOGICAL STRUCTURE
All XHTML elements must be nested within the <html> root element. It is the element from which grows the document tree. All other elements can have sub (children) elements. Sub elements must be in pairs and correctly nested within their parent element. Within the html element there are two necessary “child” elements: the head element and the body element.
Logical Markup Example (Using semantic markup to describe content.)
<!DOCTYPE>

<html>

<head>
<title>Working with Structure</title>
</head>
<body>
<h1>Welcome</h1>
<p>Welcome to the site where structure matters!</p>
<h2>Getting Into Structure</h2>
<p>In order to begin working with structure, you need to be aware
of:</p>
<ul>
<li>DOCTYPE declarations</li>
<li>Properly structured head and body components</li>
<li>Logical structures for content markup</li>
</ul>
</body>

</html>
VIEWING THE DOCUMENT TREE
When you have a more semantic document, you can easily visualize it via the document tree, which is a map that reflects where elements go within the structural hierarchy of the document. This tree becomes critically important when using CSS because of the concept of inheritance.

Document root: html
- head & body are children to the root
- title is child to the parent head
- h1 , h2, p, ul all children of body
- Each li is a child to ul
ELEMENTS MUST BE PROPERLY NESTED
In HTML some elements can be improperly nested within each other like this:
<strong><em>This text is bold and italic</strong></em>
In XHTML all elements must be properly nested within each other like this:
<strong><em>This text is bold and italic</em></strong>
TAG NAMES MUST BE IN LOWER CASE
This is because XHTML documents are XML applications. XML is case-sensitive. Tags like <p> and <P> are interpreted as different tags.
This is wrong:
<BODY>

<P>This is a paragraph</P>
</BODY>
This is correct:
<body>

<p>This is a paragraph</p>

</body>
ALL XHTML ELEMENTS MUST BE CLOSED
Non-empty elements must have an end tag.
This is wrong:
<p>This is a paragraph
This is correct:
<p>This is a paragraph</p>
Empty Elements Must Also Be Closed
Empty elements must either have an end tag or the start tag must end with />.
This is wrong:
This is a break<br>
This is correct:
This is a break<br />
IMPORTANT Compatibility Note:
To make your XHTML compatible with today’s browsers, you should add an extra
space before the “/” symbol like this: <br />.
THE <!DOCTYPE> IS MANDATORY
An XHTML document consists of three main parts:
- the DOCTYPE
- the Head
- the Body
BASIC TAGS CONTINUED
Last week we introduced the basic page tags and the <p> tags. Today we are going to learn the rest of the most commonly used tags.
There are two types of HTML formatting tags: inline and block level tags. These two types have slightly different behaviors.
Inline tags
These tags are designed to enclose content that is part of another element. Generally they are used when you want to affect just part of the text in a paragraph. There are just two inline tags we are going to talk about today.
Bold text:
<strong></strong> or <b></b>
Italic text:
<em></em> or <i></i>
Line breaks:
This is a self-closing (non-container) tag. This will create a single line break wherever it is placed in the code:
<br />
Block level tags
These tags are used to control blocks of content. The main characteristic that differentiates block from inline is that block level elements appear by default with a line break before and after them. Here are the most common block level tags you will work with:
The six heading levels:
<h1>Heading 1</h1>
<h2>Heading 2</h2>
<Hh3>HEADING 3</h3>
<h4>Heading 4</h4>
<h5>Heading 5</h5>
<h6>Heading 6</h6>
Again, the paragraph tag:
<p></p>
LISTS
There are several tags that you can use to create a “list” of items which is a very important way of organizing content. When used in combination with CSS, lists are a great way to create navigation menus. The tags below are a little different than the tags above in that you must use two distinct tags to create the list, one that contains the entire list, and one that contains each item in the list. Let’s look at
There are three types of lists: unordered, ordered, and definition.
Unordered List
This tag, enclosing all list content, creates a bulleted list.
The code:
<ul>
<li>apples</li>
<li> oranges</li>
<li>pears</li>
</ul>
This is how the list would look:
This is a LIST with an a href which makes your list a LINK.

List Item
NOTE: Inside the <ul> or <ol> tages, you use a set of tags, enclosing each line, or “list item” item:
<li></li>
Unordered List
This is how it would look on the web.

This is how it would look written in Text Wrangler.

This is the code you would use:
<p>This is an example of an unordered list.</p>
<ul>
<li>Unordered information</li>
<li>Ordered information</li>
<li>Definition lists</li>
</ul>
Ordered List
This tag, enclosing all list content, creates a numbered list:
<ol></ol>
To make an ordered list, like this:
- Monday
- Tuesday
- Wednesday
- Thursday
- Friday
Use this code:
<ol><li>Monday</li><li>Tuesday</li><li>Wednesday</li><li>Thursday</li><li>Friday</li></ol>
Definition List
This tag involves a main phrase, and then a definition for that phrase that appears indented and appearing on a separate line.
The
<dl></<dl>
tag defines the definition list.
The
<dt></dt>
tag is used for the main phrase in the list.
The
<dd></dd>
tag is for the definition itself.
This is how it would show up on the web.

This is how it would look written in Text Wrangler.

Use this code:
<dl>
<dt>This names an item</dt>
<dd>This defines the item names</dd>
<dt>This names another item</dt>
<dd>This defines the other item named</dd>
</dl>
To create an unordered list, like this:Use this code:
<ul>
<li>Unordered information</li>
<li>Ordered information</li>
<li>Definition lists</li>
</ul>
Common Link Types
Link to launch a new window <a href=”newpage.html” target=”_blank”> Link to launch email application<a href=”mailto:myname@email.com”>
<a href=”mailto:myname@email.com”>email me now</a>
OR
<a href="mailto:someone@example.com?Subject=Hello%20again">
Send Mail</a>
When someone clicks on the the “Send Mail”, the email field will pop up.
Anchor Links to a specific place on the same page
<a name=”top”></a>
= an anchor must be indicated in a single, specific spot on the page
<a href=”#top “>Return to Top</a> = a link with “#” before the name that was applied to the anchor link specified in another part of the page.
All the basic tags in one document
NESTED ELEMENTS RULES
Important Note! With the exception of div, you cannot nest one block-level element inside of another. For example, this is wrong:
<p><h1>You can't put a heading inside a paragraph!</p>
But this is ok:
<div><p>You CAN put a paragraph inside a div!</p>
You can nest inline elements inside each other:
<strong><em>I can make this text bold and italic!</em></strong>
And you can nest inline elements inside block-level elements:
<p><em>I can make this paragraph italic!</em></p>
But you can never nest a block-level element inside an inline element:
<em><p>This is wrong!</p></em>
AND you can never nest a block-level element inside a list element:
<li><p>This is wrong!</p></li>
SPECIAL CHARACTERS AND NON-BREAKING SPACES
Text characters that are outside the normal ASCII character set must be represented in html via special character codes. This includes things like em dashes, curly quotes, ampersands, etc. These special character codes always begin with an ampersand (&) and end with a semi-colon(;). For example, an em dash (—), would be represented in your code like this:
—
or
—
One especially useful special character is the non-breaking space:
Put this character in your code when you want to have more than one white space in a row. However, do not use it to create indented or tabbed formatting, we’ll learn how to do that later!
For a full list of character codes, visit W3School’s Special Characters Reference.
LINKING FILES
File linking is done through the use of the <a> or anchor tag.
Use the following syntax for linking to another document:
<a href="URL_of_target_document">link_text</a>
For example, if you were to link to Google, you would use the following code:
<a href="http://www.google.com/">Google</a>
To link to an email address, which will spawn the user’s designated email client, you simply need to add the “mailto” parameter:
<a href="mailto:emailaddress@server.com">email_text</a>
You may also link to “anchors” in the same file.
To do this, you must create both the link:
<a href="filename.html#anchor_name">anchor_text</a>
and the anchor to link to:
<a name="anchor_name">anchor_text</a>
Absolute vs. relative linksWhen citing the URL of the target document, you may use an “absolute” or “relative” path.
An “absolute” path is the full web address of the document, with protocol. This path will not change depending on the document that is linking to it. This type of link is primarily used when you are linking to an address that is external to the site you are linking from.
For example, the absolute path of this site is:
A “relative” path is one where the information is given relative to the document on which the link appears. This type of linking will only work within a given site directory, it can not be used for external URLs.
With relative links, you must be aware of where the document is located in the file directory in relation to the file being linked to.
In the same directory:
filename.html
In a lower (sub) directory:
subdir_name/filename.html
In a higher (parent) directory:
../filename.html
Relative to the site root:
/filename.html
(note: it is unusual to use paths relative to the site root)
LINK TARGETS
Unless instructed otherwise, a Web browser will open a target document in the same window as the linking document. The user of the “target” attribute allows you to direct the target document to an alternate window. Some of the attributes below only apply to framesets, which we will cover briefly later in the course.
TARGET ATTRIBUTE VALUES
_blank Opens the linked document in a new window
_self Opens the linked document in the same frame as the link
_parent Opens the linked document in the parent frameset
_top Opens the linked document in the main browser window, replacing all frames
name Opens the linked document in the window with the specified name
Common Link Types
Link to launch a New Window
<a href=”newpage.html” target=”_blank”>
Link to launch email application
<a href=”mailto:myname@email.com”>
Anchor Links to a specific place on the same page
<a name=”top”></a>= an anchor must be indicated in a single, specific spot on the page
<a href=”#top “>Return to Top</a> = a link with “#” before the name that was applied to theanchor link specified in another part of the page
Complete HTML Structure: Using Lists in Code Academy
This unit covers more advanced HTML structure and teaches you how to customize your pages.
HTML Basics II: 16 exercises
COMMENTING YOUR CODE
You can place a comment tag in your HTML to put a note into the code that will not be rendered by the browser. This is especially handy in a long and complex page. A comment is formatted as follows:
<!-- This is a comment -->
Everything between the <!– and –> tags will be hidden from the browser, but visible when you view the source.
COLOR
All color in Web pages, whether it is in text, background color, or other interface elements, is expressed in the HTML via hexidecimal codes. These codes consist of a # followed by 6 letters and numbers. For example, the code for white is #FFFFFF.
Below are two excellent references for the hex codes for the Web-safe palette.The Web-safe palette is a collection of colors that have been determined to be consistently rendered across boundaries.
Webmonkey Color Code Chart
Visibone Webmaster’s Palette
FONTS
Because a Web browser can only utilize those fonts installed on the end-user’s machine, there are a limited number of fonts reliably available across platforms. Here’s an up-to-date list of them:
You should only use these fonts, or generic font designations, in your style sheets.
Here is a great resource for viewing how Web fonts will look in a browswer:
META DATA
Meta data is located within the <head> of a web page. Your meta data is basically information that you insert that explains what this page/site is all about. Copy and past the code text below into your head:
- Keywords:
Information inside a meta element describes the document’s keywords.
The Code Looks Like this:
<meta name="keywords" content="HTML, DHTML, CSS, XML, XHTML, JavaScript, VBScript"> - Description:
Information inside a meta element describes the document.
The Code Looks Like this:
<meta name="description" content="Free Web tutorials on HTML, CSS, XML, and XHTML"/>
Creating your own HTML pages with Text Editors
To make your own Web pages, start with the code above. HTML pages can be created in any Plain Text Editing application. DO NOT use Microsoft Word, as it will add extra formatting that will break your code. Here are links to several text editors that you can download and use to create your pages:
Homework | Week 12
CODE ACADEMY
COMPLETE THESE | INTRODUCTION TO HTML
HTML Basics
Fundamentals of HTML
Build Your Own Webpage
Now that you know HTML, you can create your very own webpage. Let’s get started!
HTML STRUCTURE: USING LISTS
HTML Basics II
Now that you know how to build a webpage, let’s learn how to make it look a little nicer. You can add lists, change fonts, and more!
Social Networking Profile
It’s hard to believe, but you now know enough HTML to create your own basic social networking profile! Let’s get started.
To review what we learned, go to Code Academy and create an account. Complete the following exercises:
Introduction to HTML
This unit will introduce you to the basics of HTML, the language used to create websites.
HTML Basics: 13 exercises
HTML Structure: Using Lists
This unit covers more advanced HTML structure and teaches you how to customize your pages.
HTML Basics II – 16 exercises
BE SURE to take a screen shot of each tag at the end of the lesson and add that to your homework page.
Create a NEW folder on your desktop called: webdesign
inside that folder use Text Wrangler to create a page and save it as index.html Upload that folder to the public_html folder on your website. Create a list and add an A HREF link to three more pages, artist.html, bio, html and resume.html. Create hyperlinks to your artist, bio, resume pages on this page.
BIO.HTML (ALL IN LOWER CASE)
Using the basic page template that you saved in class today, create an HTML page that contains a short bio of yourself. Save the file with the following name: bio.html – Use all of the new tags we learned today to format your resume.
RESUME.HTML (ALL IN LOWER CASE)
Using the basic page template that you saved in class today, create an HTML page that contains a resume of yourself.
Save the file with the following name: resume.html – Use all of the new tags we learned today to format your resume.
ADD
- Page anchor links within the longest page to take the user back up to the top of the page
- External links to at least two (2) web pages that you will use as online reference related to the topics you wrote about on your pages
- An email link to your contact email address
- Add at least two LISTS to your resume.
(WE WILL UPLOAD IT TO YOU WEBSITE DURING NEXT WEEK’S CLASS) it on YOUR site. Here is an example of a resume.
ARTIST.HTML (ALL IN LOWER CASE)
- Create an artist statement and resume for yourself as a HTML – save the file as artist.html.
- Add at least five tags to that page
- (WE WILL UPLOAD IT TO YOU WEBSITE DURING NEXT WEEK’S CLASS) it on YOUR site. Here is an example of an artist statement.
HOMEWORK.HTML
- Create a page – save the file as homework.html –(WE WILL UPLOAD IT TO YOU WEBSITE DURING NEXT WEEK’S CLASS) .
LIST
Create a LIST at the top of each page (just inside the body tag) with the names:
index.html
resume.html
artist.html
- Add an a href link to your resume.html page creating a link to an external website. Add the code for target = blank.
- Add the code for the email link to your resume.html page.
- Add the space character to anywhere on your resume.html page.
- Add the comment code: <!– This is a comment –> somewhere on your page and make a comment.
- Add both lines of METADATA code into your head.
- Create a new page called: homework.html and upload it to your server. Add hyperlinks on that page that will take me to your index.html, artist.html, homework.html and contact.html pages.
- Create a new html page called “contact.html”. Create hyperlinks to your homework, resume and artist pages on this page.
- Add links between each of the pages.
- You can do this by create a LIST and adding that list to each of your pages. Below is an example:
- <ul> <li><a href=”http://www.katmakes.com”>Home</a></li> <li><a href=”http://www.katmakes.com/resume.html”>Resume</a></li> <li><a href=”http://www.katmakes.com/artist.html”>Artist</a></li> <li><a href=”http://www.katmakes.com/contact.html”>Contact</a></li> <li><a href=”http://www.katmakes.com/hw.html”>Homework</a></li> </ul>
1. DELICIOUS
Tag THREE websites on del.icio.us that are relevant to web design and specifically to what you learned in class today. It can be a tutorial, an article, a design blog or anything else that you think would be useful as a reference. Write a note in the comment section about why you think each one is a useful resource.
REFERENCE: The following three (3) reference articles are great resources…
Webmonkey – HTML Cheatsheet http://www.webmonkey.com/webmonkey/reference/html_cheatsheet/
Webmonkey – Stylesheets Guide http://www.webmonkey.com/webmonkey/reference/stylesheet_guide/
Brett Merkey – Most Useful CSS Properties with Examples http://home.tampabay.rr.com/bmerkey/cheatsheet.htm
Week 11 | Illustrator III
******NOTE: ALWAYS BRING A BACK UP OF ALL YOUR FILES IN TO CLASS ON A FLASH DRIVE. ALSO, PLEASE BRING IN HEADPHONES TO EACH CLASS SO THAT YOU CAN REVIEW VIDEOS WHILE DOING IN-CLASS ASSIGNMENTS.*******
When Saving Files | Save as:
- Example: 2015_Smith_John_AccessingTools_v1
- Tag your images in Flickr with the following tag:
interactivemediaramapo2015
***ALWAYS SAVE YOUR AI FILES!**
The People Who Are Crazy Enough To Think They Can Change The World Are The One’s Who Do.
# 1 | SYMBOLS PALETTE
Symbols and how to use them.
Download Project Files
Complete exercise and save as follows: 2015.4.13_Last Name_First Name_SymbolsPalette
# 2 | THE MAGIC WAND
Look at the magic wand tool and how it’s used for “fuzzy” selection.
Complete exercise and save as follows: 2015.4.13_Last Name_First Name_MagicWand
# 3 | ART BOARDS
Look at how to use art boards in Illustrator.
Complete exercise and save as follows: 2015.4.13_Last Name_First Name_ArtBoards
# 4 | GRADIENTS
Take a look at how to use the gradient tool to create sophisticated visual effects.
Complete exercise and save as follows: 2015.4.13_Last Name_First Name_Gradients
Alan Watts – What if Money Were No Object?
# 5 | USING MASKS
Take a look at how to use masks to isolate and eliminate vector elements.
Complete exercise and save as follows: 2015.4.13_Last Name_First Name_Masks
# 6 | VECTOR EFFECTS
Learn how to apply special effects to your vector illustrations.
Complete exercise and save as follows: 2015.4.13_Last Name_First Name_Vector
# 7 | 3D TOOLS
Rendering 3D in Illustrator.
Complete exercise and save as follows: 2015.4.13_Last Name_First Name_3D
# 8 | GRADIENT MESH AND SHADING
Applying gradient meshes and shading to objects.
Complete exercise and save as follows: 2015.4.13_Last Name_First Name_GradientMesh
# 9 | TRACING AND LIVE PAINT
Tracing and using the Live Paint tool.
Complete exercise and save as follows: 2015.4.13_Last Name_First Name_Tracing – GET A LINE ART DRAWING from Google Images for this exercise. (Change the colors, etc. Personalize it.) Upload to both Flickr and your website.
Homework | Week 11
Homework 1: Tutorials
Complete the tutorials. Upload them to BOTH Flickr, COPY the embed code and add to your website homework blog post. Change the colors, strokes, etc. Personalize them. Be sure to label each one.
- SYMBOLS PALETTE
- THE MAGIC WAND
- ART BOARDS
- GRADIENTS
- USING MASKS
- VECTOR EFFECTS
- 3D TOOLS
- GRADIENT MESH AND SHADING
- TRACING AND LIVE PAINT
Homework 2: DELICIOUS
On your del.icio.us account tag three Web Sites that focus on Illustrator, or anything we learned in class today, and write a note in the Delicious comments section about why you think each one would be a good resource for this class. *Make sure you also add the tag: interactivemediaramapo2015, AS WELL AS additional tags.
Homework 3: Project I DUE WEEK12
Research 1
Research 2
Sketches – low and high fidelity sketches
Illustrator Iterations of Project I including front, back, spine and logo
Final .ai and .pdf files
Word document, minimum 300 words,
- Requirements:
- Project Research & Conceptual Sketches
- Preliminary Comps (Sketches – multiple iterations)
- Final Comps (Sketches – multiple iterations)
- Preliminary Logo Comps (Sketches – multiple iterations)
- Final Logo Comps (Sketches – multiple iterations)
- Preliminary Logo and Label Comps – designed in Illustrator CS6
- Word document, minimum 300 words,
@@Deliverable@@
- Create a folder date-lastname-firstname-illustrator-project I
- Place ALL files inside that folder
- Place the folder inside your DropBox
- Command click on the folder to SHARE LINK
- Copy link
- On week 12 comments, give me a link to your DropBox folder
- ALL PROJECT ITERATIONS SHOULD BE ON YOUR PROJECT WEBSITE PAGE
Week 10 | Illustrator II
#1 | Layerless Thinking
Explains how layers are used (or not used) in Illustrator. Download project file here.
Complete exercise and save as follows:2015.3.30_Last Name_First Name_LayerlwaaThinking
#2 | Locking & Hiding
Let’s look at manipulating groups by locking and hiding. DOWNLOAD the source file here.
Complete exercise and save as follows: 2015.3.30_Last Name_First Name_LockingHiding
#3 | THE ALIGN PALETTE
Complete exercise and save as follows: 2015.3.30_Last Name_First Name_AlignPalette
#4 | PATHFINDER PALETTE
Complete exercise and save as follows: 2015.3.30_Last Name_First Name_PathFinderPalette
#5 | THE TYPE PALETTE
Download the project file here.
Complete exercise and save as follows: 2015.3.30_Last Name_First Name_TypePalette
#6 | THE STROKE PALETTE
Complete exercise and save as follows: 2015.3.30_Last Name_First Name_StrokePalette (Change the colors, etc. Personalize it.)
HOMEWORK | WEEK 10 | Due 4.6.15
- Homework 1: Complete ALL in-class tutorials. Upload them to Flickr, copy the embed code and paste in your homework blog post. EACH image posted should have the title above it and should link back to Flickr. Be sure to label each one.
- #1 | Layerless Thinking
- #2 | Locking & Hiding
- #3 | THE ALIGN PALETTE
- #4 | PATHFINDER PALETTE
- #5 | THE TYPE PALETTE
- #6 | THE STROKE PALETTE
- Homework 2: Complete your RESEARCH for project 1 – add FIVE more links in Delicious from your research and inspiration for your project idea. THIS WILL MAKE A TOTAL OF TEN. Tag it with the additional tag: Illustrator Project 1. Make sure you add your comments in the COMMENT section on what inspired you, what design aesthetics you might use, etc.
- Homework 3: List the NAME of your project and if you’re going to be creating a CD or DVD.
- Homework 4: Hand draw your high fidelity iterations (color) of your front and back covers, spine and logo. Upload to Flickr and copy embed code and add to your Illustrator page.
- Homework 5: Using Illustrator, create your first iterations (color) of your front and back covers, spine and logo. Upload to Flickr and copy embed code and add to your Illustrator page.
- Homework 6: On your del.icio.us account tag three Web Sites that focus on Illustrator, and write a note in the Delicious comments section about why you think each one would be a good resource for this class. ALSO, add week 10 in your comments section so that I can keep track of your comments. *Make sure you also add the tag: interactivemediaramapo2015 AS WELL AS add additional tags.
- Homework 8: Project 1The following are due for Monday.
- Research 1 (should be already completed)
- Research 2
- Sketch Round 1 (doodling) (should be already completed)
- Sketch Low Fidelity (pencil) (should be already completed)
- Sketch High Fidelity (pencil and colored markers)
- Logo Iteration 1 (should be already completed)
- Logo Iteration 2
- Cover Iteration 1 | USING ILLUSTRATOR
- Cover Iteration 2
- Back Cover Iteration 1 | USING ILLUSTRATOR
- Spine Iteration 1 | USING ILLUSTRATOR
- Homework 9 | Project I | DELIVERABLES
Your entire project should be finalized and drawn in Illustrator. Your front, back and spine designed and completed in color, all materials including your inspiration, research, .jpgs/.pngs, .ai files, your Word document and your final design saved as a PDF. Everything should be burned to your CD/DVD burned, all items placed in your CD/DVD case including writing your name, date and project title on the CD/DVD. Final project due on Week 12 AT THE BEGINNING OF CLASS.
Items That Must Be Physically Turned In On Week 12 at the START of class:
- Your designs PRINTED AND inserted into the cd/dvd case.
- A link to Project 1 posted on the class website
- Adobe Illustrator Project I: Written Description, on your website, printed out and uploaded to DropBox.
- All .ai, .jpg and .doc files uploaded to DropBox.
- Create a folder that you upload to DropBox titled as follows:
Date_Last name_First name_Illustrator Project 1 Upload all your project files there.
Week 9 | Illustrator
Introduction to Adobe Illustrator CS6
Adobe Illustrator History
Adobe introduced Illustrator 1.1 was introduced in 1987, using the Bezier curve as the basis for vector graphics. These vector graphics create PostScript files visually.
Understanding Vector Graphics (Illustrator)
Vector is another word for a scalable graphic design. They are constructed shapes, colors, and placement that together, form a picture, and are ‘scalable’. Vector graphic formats include PICT, EPS, and WMF as well as PostScript and TrueType fonts.
In their original format, vector graphics are easy to alter; anything about the graphic can be changed. Vector graphics allow you to open a previously saved file, change it, and then save it again. You can open the file an unlimited number of times, change it, and then save it and you never lose the integrity of the document. They offer exceptionally high quality print; the vector file type most typically requested by printing companies is called .EPS – which is short for Encapsulated Post Script.
Adobe Illustrator creates graphics in vector format, and then from these vector images a whole multitude of other file types can be created without changing the scalable attributes of the vector file (the master file). From this master file you can create a GIF, JPEG, PNG, TIFF, XBM, BMP, and PCX file. Note, you can take a vector file and turn it into a bitmap bile but you CANNOT take a bitmap image and turn it into a vector image.
When a shape or an object in Illustrator, it is considered either an open path or a closed path. When the path is enclosed, a square for example, it’s call that a closed path. When the beginning and ending points are not connected, a line for example, that is an open path. A path is made up of multiple segments with each segment having an anchor point at the beginning and one at the end. Anchor points control the shape of the path. When you draw a shape, it is considered to be an object in Illustrator. Anything added is always considered an object.
- Lynda.com video on vector graphics.
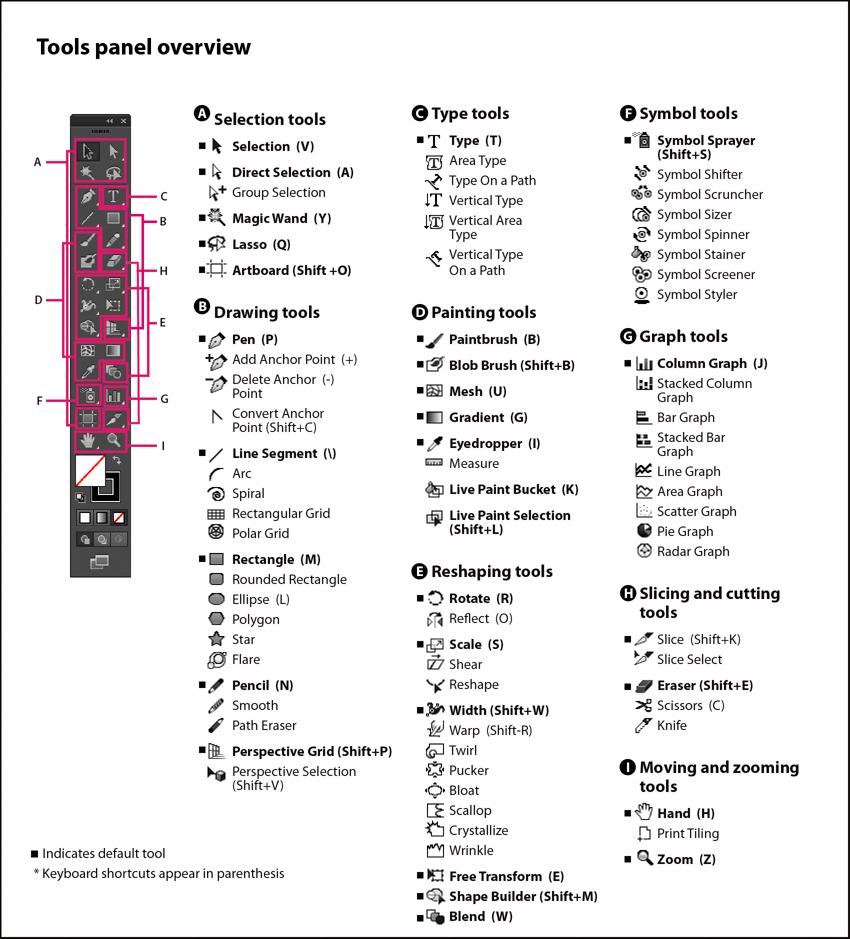
Touring the Illustrator Interface
Tools Panel Overview
The Tools panel appears at the left side of the screen. You can move the Tools panel by dragging its title bar. You can also show or hide the Tools panel by choosing Window > Tools.
You use tools in the Tools panel to create, select, and manipulate objects in Illustrator. Some tools have options that appear when you double-click a tool. These include tools that let you use type, and select, paint, draw, sample, edit, and move images.
You can expand some tools to show hidden tools beneath them. A small triangle at the lower-right corner of the tool icon signals the presence of hidden tools. To see the name of a tool, position the pointer over it.
Setting Up a New Document
- File – New
- Choose a profile: print, web, video/film, etc.
- Advanced: choose your color mode (CMYK for print, RGB for web)
Lynda.com video on touring the interface.
- Illustrator CS6 tutorial from Adobe
Basic Tools
Illustrator | Saving Files
Creating Objects
The Pen Tool
Selection Tools
Shape Tools | Selection Techniques Review
- Open the attached .ai file here. You’ll see a completed fish illustration on the top and the individual components of that fish at the bottom.
Object-Oriented Design
Save the document as: 2015.3.23_Last Name_Object-Oriented Design – Upload that file to Flickr and post on your website.
Grouping
Save the document as:2015.3.23_Last Name_First Name_Grouping – Upload that file to Flickr and post on your website.
MAJOR PROJECT 2
(Illustrator CS 6): CD/DVD
The assignment is to create a digital still life (a CD/DVD design including front, back and spine), in Illustrator, using your knowledge of the drawing tools. The designs will be set up and must be sketched BEFORE moving to Illustrator.
Design Brief for Illustrator
CD/DVD Case Design
Develop a design for a compact disc CD/DVD case. This design will include both the front and back cover insert for a conventional jewel CD/DVD case, along with the title panels. The design can focus on either an audio CD/DVD or CD/DVD game, CD/DVD movie title, or idea of your own and can be either real or fictitious.
Design Specifications: Size Conventional CD/DVD case dimensions. Download a print ready template here. Download the .ai file titled:
CD Package
4.75″x 4.75″
Double Back
This gives you the layout for the front and back but not the spine.
CD/DVD Name: Use a real or fictitious audio CD name – or real or fictitious CD or DVD game title.
Logo: Design an original logo for the company of manufacture for either the audio CD or game CD/DVD.
Information: The project will include all of the information typically found on either an audio or game compact disc. Included will be the side title bars and the back cover insert. Dimensions can be found on a typical CD case or DVD cover.
Project specifications include research, size, name, manufacturer, font choices, initial logo design and initial box design and final designs.
Written Description: Detailed 500 word document detailing your design process, the tools you used and what you would change if you had to do it again.
* Each project must be submitted with following items: Research & Conceptual Sketches, Preliminary Comps, Final Designs and written description. You will be graded separately on each phase of your projects. You will also be submitting each final design as a digital file.
Final Package Printout:
Final project must be printed in color, at full size, and inserted into a cd/dvd case. The cd/dvd inside the case should ALL files you created (including hand sketches, multiple .ai iterations and written description doc. All files should also be uploaded to your website on a page titled PROJECT 2 | Illustrator. KEEP ALL ORIGINAL FILES. They will be turned in at the end of the semester on a DVD.
A NOTE ON SKETCHING
- When designing anything, (including the CD/DVD project) sketch often!
Sketching helps you think about content, hierarchy and flow among other aspects. Sketches are cheap, easy to do and very fast. You should be able to create one new idea every thirty seconds. Sketching is also one of the best ways to communicate ideas about layout, user experience and user flow for a site.
DON’T use the computer until we review the sketches in class. Young designers tend to skimp on the sketches or omit them altogether. Too many designers transition too early from sketches to a higher fidelity design without first exploring all possible solutions.

Create a NEW page call Illustrator Project 1. The parent page should be Interactive Media. On the Illustrator Project 1, heading: Sketches. Under that, create a list:
- Research 1
- Research 2
- Sketch Round 1
- Sketch Low Fidelity (pencil)
- Sketch High Fidelity (pencil and colored markers)
- Logo Iteration 1
- Logo Iteration 2
- Logo Iteration 3
- Cover Iteration 1
- Cover Iteration 2
- Cover Iteration 3
- Back Cover Iteration 1
- Back Cover Iteration 2
- Back Cover Iteration 3
- Spine Iteration 1
- Spine Iteration 2
- Spine Iteration 3
The sketches from the instructions below need to be uploaded to Flickr and the URL linked to each one of the above.
- Create CD/DVD with various iterations in your sketch book. Scan your drawings OR take a photo and upload to Flickr, then link the URL to the above.
- Create Logo for CD/DVD with various iterations in your sketch book. Scan your drawings OR take a photo and upload to Flickr, then link the URL to the above.
HOMEWORK | Week 9 | Due Monday March 30th
- Create a new page called Illustrator Project 1 with the parent page INTERACTIVE MEDIA. Add the bullet point listed above.
- RESEARCH for project 1 – add FIVE links in Delicious from your research and inspiration for your project idea. Tag it with the additional tag: Illustrator Project 1. Make sure you add your comments in the COMMENT section on what inspired you, what design aesthetics you might use, etc.
- List the NAME of your project and if you’re going to be creating a CD or DVD.
- Hand draw at least two iterations for your first design sketches. Upload to Flickr and copy embed code and add to your Illustrator page.
- List your Delicious URL on your homework blog posting
- On your del.icio.us account tag three Web Sites that focus on Illustrator or anything we learned in class today, and write a note in the Delicious comments section about why you think each one would be a good resource for this class. ALSO, add week 9 in your comments section so that I can keep track of your comments. *Make sure you also add the tag: interactivemediaramapo2015 AS WELL AS add additional tags.
- Finish ALL in-class exercises, create a new blog posting title: Week 9 | Homework | Due March 30
- Open the attached .ai file here. You’ll see a completed fish illustration on the top and the individual components of that fish at the bottom.
- Choose the Selection tool – Click on the large red fin.
- Click and drag to reposition the fin anywhere on the page.
- Choose the Direct Selection tool from the Tools panel.
- Reposition the cursor over on of the tips of the fin and click when you see the arrow with the small white square.
- Click on the solid anchor point and change the shape of the fine. (this shows you how to alter the shape). Hit Command Z to undo that.
- Grouping the Scales:
- Click the Selection tool – Click on one of the orange scales – hold down the Shift key and click on a second scale. Now two scales are selected.
- Choose Object > Group or Command+G and the two scales are grouped together.
- Shift+click a third scale to add to the selection. Select all the scales.
- Press Command+G to group all six scales.
- Choose Select> Deselect or Shit+Command+A to deselect the scales.
- Using the Selection tool, click on one of the first scales you selected.
- With all the scales selected, click and drag the scales on toop of the fish’s orange body.
- Click on the Selection tool to reposition the rest of the separate components together to complete the fish.
- Choose File > Save As and save it with the following file name: 2014.9.22_Last Name_First Name_Exercise_Fish
Isolation Mode:
- Using Shape and Transform Tools to Create Artwork
- Download the .ai file for this exercise here. Open the file and you’ll see artwork of two swimming fish. Keep this file open for reference.
- Open this .ai file now. You’ll see a document with four guides in the center of the peage.
- Choose Illustrator > Preferences > Units and change the measurement units in the General drop-down menu to Inches. Press OK.
- Choose File > Save As and save it with the following file name: 2014.9.22_Last Name_First Name_Exercise_Fish2
- Using the Transform Tools
- Click on the Star tool and select the Rounded rectangle tool.
- Click and drag to crate a rectangle with rounded corners of any size.
- Activate the selection tool and click and drag until the rounded rectangle fits the dimensions of the guides located in the center of the document.
- Adding a Fill Color
- Now fill the rounded rectangle with a color.
- Select the rounded rectangle with the Selection tool
- Locate the Control panel at the top of your workspace and click on the Fill box. Color swatch appear.
- Select the color CMYK Blue
- Modifying a Shape
- Select the Polygon tool and click on the artboard.
- Type 3 into the Sides text field and press ok.
- Choose the Selection tool and click and drag the top center anchor of the bounding box upward to stretch the triangle.
- Click and drag each corner of the shape to resize the shape.
- Entering a Shape Size in the Transform Panel
- Choose Windows > Transform
- Select the triangle and type .5 in the W and 2 into the H and Return
- Press D – the triangle’s color reverts to the default white fill and black stroke.
- Click one on the Stroke box and select None.
- The triangle is not visible now. You can only see its anchor points.
- Viewing in Outline View
- Use the Selection tool and click on the artboard to deselect the triangle.
- Choose View > Outline.
- Use the Selection tool and click on one of the triangle’s sides and reposition it so its tip touches the center of the rectangle.
- Choose View > Preview.
- Rotating the Shape
Let’s create a series of triangle shapes and rotate them 360 degrees.
- Select the triangle. and select the Rotate tool.
- Option+click the tip of the triangle. Type in 18 into the Angle text field and press Copy. This rotates your triangle 18 degrees.
- Press Command+D to repeat the transformation.
- Continue to press Command+D until you reach the original triangle.
- Press Command+Y to return to Preview view.
- Changing the Color of the Triangles
- Now we’ll select the triangles and change their opacity.
- Switch to the Selectiion tool and select one of the white triangles.
- Choose Select > Same > Fill Color and all the white triangles become selected.
- Choose Object > Group
- Type 50 into the Opacity text field and return
Choose File and save as follows: 2015.3.23_Last Name_First Name_Triangle
Week 8 | PS Project
Please give me a link to your project post.
Week 7 | PS Banner Ads
Information Architecture
The role of an Information Architect in Web development is to develop the structure, labeling, and navigation schemes of the site. This phase is alternately known as Interaction Design and Experience Design and Information Design.
The Site Outline is the first step in this process. Now we are going to visualize our Information Architecture in the form of a Functionality Specification or Functional Spec.
With the Functional Spec you create a blueprint for your site much the way an architect does for a building. The purpose of this spec is to synthesize needs identified in the requirements document into a concrete plan for development. It includes a visual map of the overall hierarchy and flow of your site, and detail views for each interface or page. At this point in the process, we are not concerned with the graphical interface of images, colors, and fonts that will go into your site, but the outlining basic structure and functionality.

WEB DEVELOPMENT PROCESS
Site Map
A site map is a flow diagram of the pages contained in your website. This is the essential information architecture needed to build your website.
Tips for creating usable navigational systems:
Navigation should:
- Be easy to learn.
- Be consistent throughout the website.
- Provide feedback, such as the use of breadcrumbs to indicate how to navigate back to where the user started.
- Use the minimum number of clicks to arrive at the next destination.
- Use clear and intuitive labels, based on the user’s perspective and terminology.
- Support user tasks.
- Have each link be distinct from other links.
- Group navigation into logical units.
- Avoid making the user scroll to get to important navigation or submit buttons.
- Not disable the browser’s back button.
Usability First is a great resource for developing your website. Go to this link and READ IT!
Your impulse as a designer may be to skip the functional spec and jump right into graphic design. The problem with this is that it is too easy to get caught up in aesthetic decisions which can overshadow the functionality and usability of your site.
Here’s an example of what a sitemap could look like.
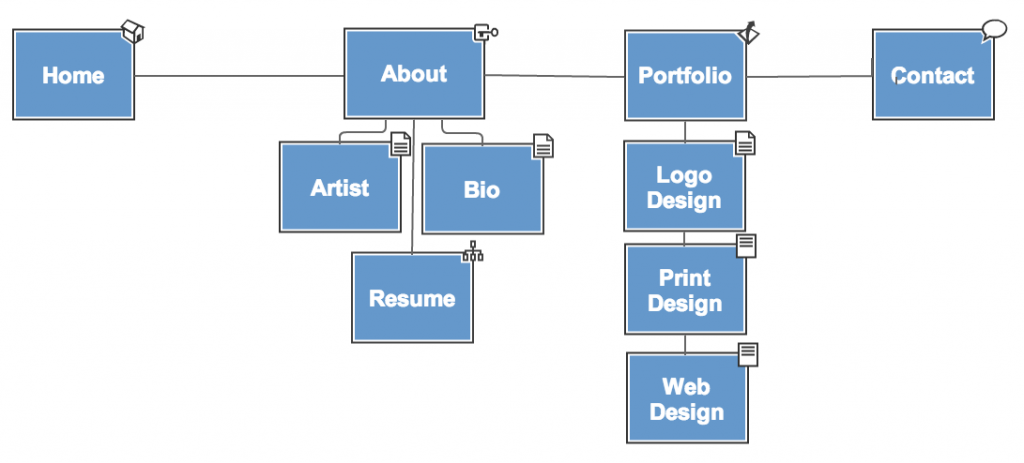
- Site Map

You can create your sitemap using any number of different tools. Here are a couple of great tools used to create sitemaps. Great designer resources.
Create an outline of your website and include:
- Content Inventory: a hierarchical view of the site content, typically in a spreadsheet format, which briefly describes the content that should appear on each page and indicates where pages belong in terms of global and local navigation.
- Site Maps: visual diagrams that reflect site navigation and main content areas. They are usually constructed to look like flowcharts and show how users will navigate from one section to another. Other formats may also indicate the relationships between pages on the site.
#1. DO NOW – Create a SITE MAP for the Charity Water homepage.
CREATING A FUNCTIONAL SPEC
For our purposes, the Functional Spec will consist of a Site Map (or Site Flow) and a set of Wireframes.
The Site Map is a visual representation of all the pages of the site and how the user navigates through them.
A Wireframe is a diagram that represents the layout, content, and functionality of each page.
You can create these documents in any drawing or page layout program you are comfortable with. A great resource for making wireframes is Google’s Mockingbird. It’s a Google Chrome add-on.
Wire frame: Where Content Elements Appear Within the Page
Wireframes are rough illustrations of page content and structure, which may also indicate how users will interact with the website. The first step is to great these diagram to establish page layout and then you will move to the visual design. Wireframes are useful for communicating early design ideas showing exactly what information, links, content, promotional space, and navigation will be on every page of the site. Wireframes may illustrate design priorities in cases where various types of information appear to be competing.
Since a site map does not indicate any hot links that may appear within a page, your wire frame will help you to determine how a user will navigate through your site beyond the main navigation. The purpose of a wire frame is to determine where each content piece will be displayed on the page, and which pieces will be displayed most prominently.
You do not need to worry about how each piece will look. The wire frame example below uses a tabbed navigation approach, however this visual is merely a placeholder and the designer may take a totally different aesthetic approach once the design phase begins.
Wireframe and Design Elements Planning
- Sketch out the basic navigation structure for your site
- Identify the number of pages
Hand-drawn Wireframe
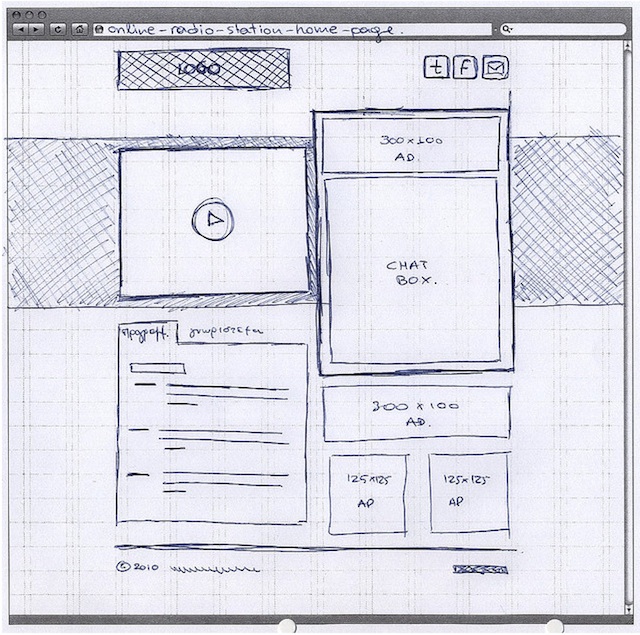
Grid Design of a Wireframe
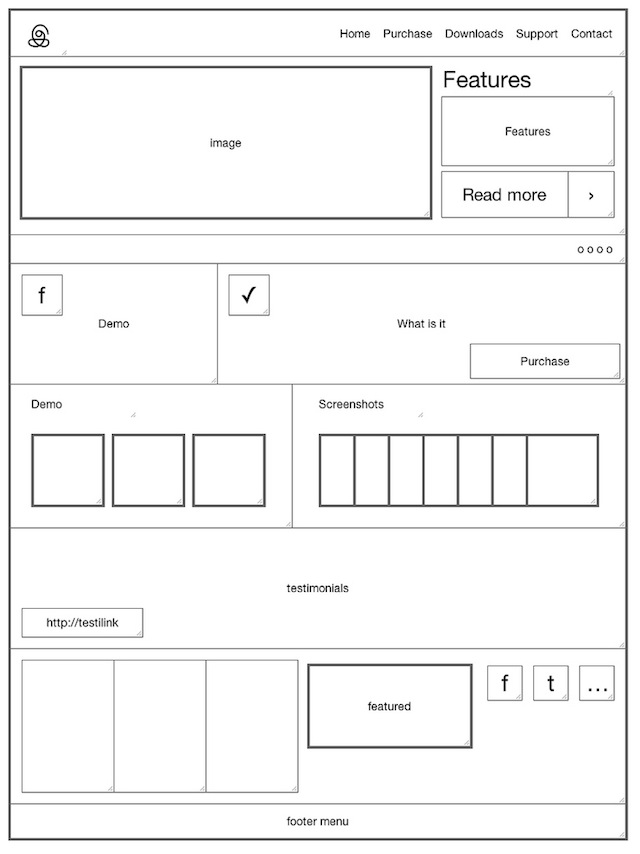
#2. DO NOW – Create a HAND DRAWN WIRE FRAME for the Charity Water homepage. Then, using Photoshop, create the grid layout for the Charity Water homepage.
INTERFACE DESIGN PRINCIPLES
Ok, we’ve gone through the Discovery phase, and determined what we want our site to be, who it is for, and what it is going to contain. We’ve mapped this all out in our functional spec. Now its time to bring to life with the next step in the Design Phase, known variously as Interface, Visual, and Graphic Design.
The Basics
Function First. A Web site is like a chair. Aesthetics don’t make up for poor usability. That beautifully carved and varnished cherry wood contraption in the corner is no good if you can’t sit in it.
Your interface is a frame for the content of your site. Just like a piece of fine art, the frame shouldn’t overshadow the picture.
Don’t make me think. Your Web site isn’t a puzzle for your users to solve. When they hit the home page, it should be immediately apparent what they can do next. Think about it, when you go to a Web page, do you carefully read every word and weigh your options before clicking to the next page, or do you quickly scan and take a shot at the best guess for what link or button will get you what you want?
Don’t reinvent the wheel, unless what you really need is a jetpack. At this point, Web designers have figured out the best solutions to the basic Web problems. And, visitors to your site spend 99% percent on other peoples sites. So give them something familiar.
Where am I? Where can I go from here? Clear, persistent navigation is crucial to a successful site.
PAGE SIZE
Unlike a printed page, you can not predict or truly control the amount of pixels you users will see. Here’s a few quick stats to check out:
2013 Monitor resolutions:
MOST POPULAR USED screen resolution: 1366 x 768
1280×800 – 18.7%
1024×1024 – 11.5%
1200×800 – 10.7%
1920×1080 – 8.1%
(These stats are from The Counter)
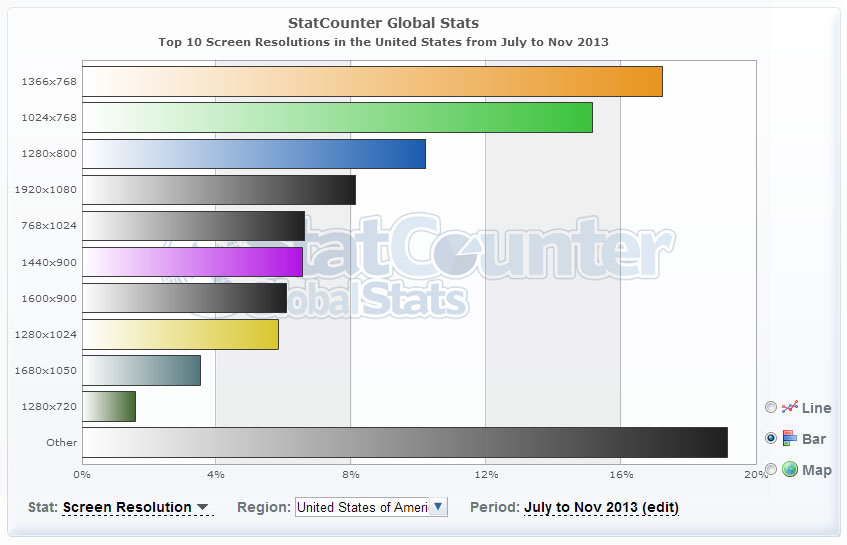
To further complicate things, now many users have the ability to view the Web through mobile devices. The iPhone, for example, has a screen size of 480×320.
You’ve got two main options:
- Use a fixed layout, and design for the lowest common denominator. Since 11.5% of users are still looking at the Web at 1280×1024, build for them and assure that the largest amount of users will be able to easily view your page.
- Use a flexible layout, one that resizes to optimally fit the current browser window.
Regardless of which size you decide to go with, building to optimal page size means keeping key elements “above the fold.” Key elements include navigation, branding, and enough page content for the main points to get across. Remember, users will scroll horizontally or vertically but rarely both. Additionally, they don’t want to scroll through more than a couple of screens of content. Pages longer than that should be broken up. The maximum visible page area is actually smaller than the screen size due to browser interface elements.
A few good links
- Don’t Make Me Think Sample Chapter
- Principles of (Web) Design
- Interaction Pattern Library
- Jakob Nielsen on Screen Size
- Useful Photoshop templates
CREATING A DESIGN MOCKUP
Creating a template
- Open the wireframes that you created for your site. You are going to use this as a guide for setting up your template. For every distinct interface that you have defined for your site, you will need to make a mockup for it. If your page layout doesn’t vary much from page to page, you may be able to use a single document and sets of layers to contain all the permutations.
- Create a new document in Photoshop or Illustrator. Go to File > New
- Set the following document settings:
- Size: 1366×768, depending on what size you decide to build for
- Resolution: 72 pixels/inch
- Mode: RGB
- Contents: Transparent
- Open your layers palette: Window > Layers.
- Create and name separate layers for each part of your design grid. Typical sections that your site may have are:
- Body (background color or pattern)
- Branding / Header (Logo and Site Title)
- Sidebar
- Global Navigation
- Content
- Section Heading
- Copy (sub-headings, paragraphs, lists, bullets and inline links)
- Footer (copyright and email link)
- Turn on your Rulers: Window > Show Rulers
- Use guides to define the sections of your design grid. Click on the Move Tool in the Tool palette and drag a horizontal and vertical guide from each ruler.
- Use the Photoshop or Illustrator tools to create your mockup. The mockup should show the client how the final interface will look. Specify logo, color scheme, fonts and positioning.
- Once you have finalized the your mockup you are ready to slice and optimize your images.
- Use the images, colors, fonts, and icons from the Charity Water homepage to complete this. You can take screen shots of each section of the homepage, create a new layer in photoshop for each section, and create one psd.
#3 DO NOW – Create a STYLE FRAME for the Charity Water homepage.
REVIEW
Wireframe and Design Elements Planning
- Sketch out the basic navigation structure for your site
- Identify the number of pages
Mock-ups based on requirements analysis
- Using tools like Go Mockingbird, layout the main pages on your site
- Keep your design elements organized
Review Cycle
- Designing anything includes a series of iterations.
- Review the entire site layout and make changes PRIOR to coding the site
Styleframes
- Using the wireframes you created as a base, add style elements to your pages.
- Include the following:
- Colors: find the hexadecimal # for your colors
- Add your images to the layout
- Add your videos to the layout
- Add your icons and/or illustrations to the layout
- Add dummy text
Resource links for this phase:
- Printable Sketch Templates for Wireframing
- Go Mockingbird
- Color Scheme Designer
- Type Tester, font comparison
- iPlotz, online template and wireframing tool
- Stripe Generator
- Favicon Generator
- Icon Finder
- Stock Exchange, free stock photos
CREATING A DESIGN MOCKUP RESOURCE
Here’s an example of a multi-page design comp:
Here’s what the actual site looks like when fully design an coded.
Good resource: 10 Tips for Creating Website Mockups
Week 7 | Homework
Delicious:
Tag three more sites that focus on Photoshop which refer to any of the techniques we learned in class today. Write a comment in Delicious about why you think each one would be a good resource for this class.
DUE WEEK 9 | Complete the THREE Do Now Tutorials listed:
#1. DO NOW
- – Create a SITE OUTLINE for the Charity Water homepage by creating the main navigational folders and sub navigational folders on your desktop. Take a screenshot of it and upload it to Flickr and your website.
- – Create a SITE MAP using Photoshop for the Charity Water homepage. Save the PSD to the Charity Water Style Frame folder on your DropBox. Upload the JPG to Flickr and your website Week 10 Homework post.
#2. DO NOW
- – Create a HAND DRAWN WIRE FRAME for the Charity Water homepage.
- – Then, using Photoshop, create the grid layout for the Charity Water homepage.
Save the PSD to the Charity Water Style Frame folder on your DropBox. Upload the JPG’s to Flickr and your website Week 10 Homework post.
#3 DO NOW – Create a STYLE FRAME for the Charity Water homepage.
- Save the PSD to the Charity Water Style Frame folder on your DropBox. Upload the JPG’s to Flickr and your website Week 10 Homework post.
#PS PROJECT DUE – Week 8
BANNER ADS
Create a banner ad campaign for any existing New Jersey nonprofit of your choice using five different banner ad dimensions from the standard web sizes. You will be required to animate TWO of the five ads.
A few New Jersey nonprofit suggestions:
- Covenant House New Jersey
- Eva’s Village
- Community Food Bank of New Jersey
- Little Kids Rock
- Also check out Charity Navigator which ranks charity. Sort the search by rankings. Four stars is the top ranking, reputable nonprofits.
- List the name, mission and URL of your chosen NJ nonprofit
- Research – with comments for each piece of research
- Inspiration – with comments for each inspiration
- Mind Map
- Sketches of Each of the Five Sizes
- Color Sketches of Each of the Five Sizes
- Photoshop Iterations
- Final Photoshop Files
The above are due on Monday, week 8.
Here are some useful design tips:
- When you design your ad, keep it simple and clear, free of clutter with a message that’s easy to read. It must jump out from the rest of the message.
- Use animation, but sparingly. You don’t want to irritate the viewer.
- The animation should not interfere with the design or message.
- The animation should loop no more than ten times.
- Keep file sizes small. It’s important that your animations load quickly. While Flash creates great animations, it can also create large files. For this reason it’s better to use compressed JPEGs or GIF files.
- When designing a banner, it’s important to understand the importance of branding, so make sure you use the company logo in some way.
- Make sure your message and call to action is on the first page in case the user decides to stop the animation.
- Use bright blue, green and yellow colors. Avoid red.
- Some words that can improve your click through ratio (CTR) are: Click here, submit and free.
- Make sure the banner links to the page that has the information mentioned on the banner. Don’t make them hunt for it.
DESIGN RESOURCES
Standard Web Banners
Banner Ads: Excellent Examples for Inspiration